I.Mô tả
Hướng dẫn kết nối và sử dụng Module Max7219 Led Matrix 8X8 với Kit Arduino Uno
Hướng dẫn cài đặt và sử dụng Arduino IDE
Mời các bạn xem Tại đây :
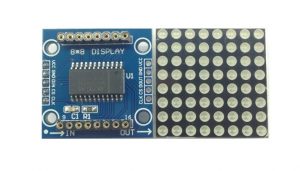
Module MAX7219 Led Matrix 8X8 :
– Supply Voltage : 4 – 5.5 v
– Serially Interfaced : SPI
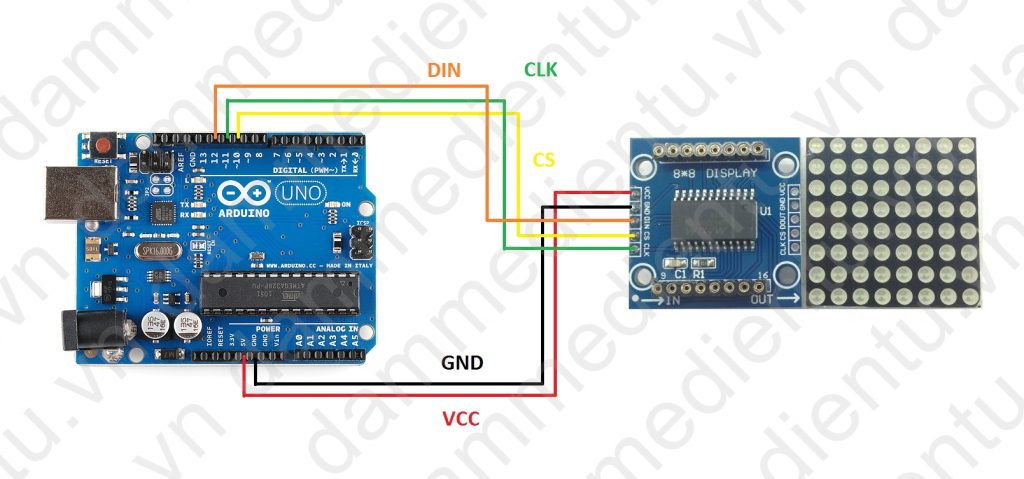
Các bạn kết nối Module với Kit Arduino theo sơ đồ sau :
Kit Arduino Module MAX7219
Pin 12 is connected to the DataIn == DIN
Pin 11 is connected to the CLK
Pin 10 is connected to the LOAD == CS
5V VCC
GND GND
Các bạn download và add thư viện LedControl-matrixMAX7219.ZIP này vào trình Arduino IDE.
Hướng dẫn add thư viện vào Arduino IDE các ban tham khảo Tại đây :
Trong thư viện có kèm theo 1 số code test cho Module các bạn có thể lấy ra sử dụng
Trong code test các bạn chú ý phần đặt chân kết nối đã đúng chưa sau đó Upload chương trình lên KIT
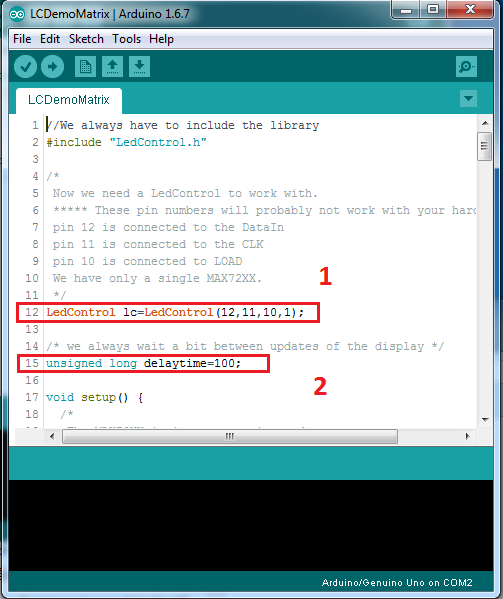
1 : là setup các chân kết nối với module trong chương trình
2 : thời gian trễ cho chương trình , tăng giảm giá trị sẽ được hiệu ứng nhanh chậm tùy ý (1000 = 1s)
Code:
///////////////////////////* CODE Test pong_game *//////////////////////////////

#include "LedControl.h"
#include "Timer.h"

#define POTPIN A5 // Potentiometer
#define PADSIZE 3
#define BALL_DELAY 200
#define GAME_DELAY 10
#define BOUNCE_VERTICAL 1
#define BOUNCE_HORIZONTAL -1
#define NEW_GAME_ANIMATION_SPEED 50
#define HIT_NONE 0
#define HIT_CENTER 1
#define HIT_LEFT 2
#define HIT_RIGHT 3

//#define DEBUG 1

byte sad[] = {
B00000000,
B01000100,
B00010000,
B00010000,
B00000000,
B00111000,
B01000100,
B00000000
};

byte smile[] = {
B00000000,
B01000100,
B00010000,
B00010000,
B00010000,
B01000100,
B00111000,
B00000000
};

Timer timer;

LedControl lc = LedControl(12,11,10,1);

byte direction; // Wind rose, 0 is north
int xball;
int yball;
int yball_prev;
byte xpad;
int ball_timer;

void setSprite(byte *sprite){
for(int r = 0; r < 8; r++){
lc.setRow(0, r, sprite[r]);
}
}

void newGame() {
lc.clearDisplay(0);
// initial position
xball = random(1, 7);
yball = 1;
direction = random(3, 6); // Go south
for(int r = 0; r < 8; r++){
for(int c = 0; c < 8; c++){
lc.setLed(0, r, c, HIGH);
delay(NEW_GAME_ANIMATION_SPEED);
}
}
setSprite(smile);
delay(1500);
lc.clearDisplay(0);
}

void setPad() {
xpad = map(analogRead(POTPIN), 0, 1020, 8 - PADSIZE, 0);
}

void debug(const char* desc){
#ifdef DEBUG
Serial.print(desc);
Serial.print(" XY: ");
Serial.print(xball);
Serial.print(", ");
Serial.print(yball);
Serial.print(" XPAD: ");
Serial.print(xpad);
Serial.print(" DIR: ");
Serial.println(direction);
#endif
}

int checkBounce() {
if(!xball || !yball || xball == 7 || yball == 6){
int bounce = (yball == 0 || yball == 6) ? BOUNCE_HORIZONTAL : BOUNCE_VERTICAL;
#ifdef DEBUG
debug(bounce == BOUNCE_HORIZONTAL ? "HORIZONTAL" : "VERTICAL");
#endif
return bounce;
}
return 0;
}

int getHit() {
if(yball != 6 || xball < xpad || xball > xpad + PADSIZE){
return HIT_NONE;
}
if(xball == xpad + PADSIZE / 2){
return HIT_CENTER;
}
return xball < xpad + PADSIZE / 2 ? HIT_LEFT : HIT_RIGHT;
}

bool checkLoose() {
return yball == 6 && getHit() == HIT_NONE;
}

void moveBall() {
debug("MOVE");
int bounce = checkBounce();
if(bounce) {
switch(direction){
case 0:
direction = 4;
break;
case 1:
direction = (bounce == BOUNCE_VERTICAL) ? 7 : 3;
break;
case 2:
direction = 6;
break;
case 6:
direction = 2;
break;
case 7:
direction = (bounce == BOUNCE_VERTICAL) ? 1 : 5;
break;
case 5:
direction = (bounce == BOUNCE_VERTICAL) ? 3 : 7;
break;
case 3:
direction = (bounce == BOUNCE_VERTICAL) ? 5 : 1;
break;
case 4:
direction = 0;
break;
}
debug("->");
}

// Check hit: modify direction is left or right
switch(getHit()){
case HIT_LEFT:
if(direction == 0){
direction =  7;
} else if (direction == 1){
direction = 0;
}
break;
case HIT_RIGHT:
if(direction == 0){
direction = 1;
} else if(direction == 7){
direction = 0;
}
break;
}

// Check orthogonal directions and borders ...
if((direction == 0 && xball == 0) || (direction == 4 && xball == 7)){
direction++;
}
if(direction == 0 && xball == 7){
direction = 7;
}
if(direction == 4 && xball == 0){
direction = 3;
}
if(direction == 2 && yball == 0){
direction = 3;
}
if(direction == 2 && yball == 6){
direction = 1;
}
if(direction == 6 && yball == 0){
direction = 5;
}
if(direction == 6 && yball == 6){
direction = 7;
}

// "Corner" case
if(xball == 0 && yball == 0){
direction = 3;
}
if(xball == 0 && yball == 6){
direction = 1;
}
if(xball == 7 && yball == 6){
direction = 7;
}
if(xball == 7 && yball == 0){
direction = 5;
}

yball_prev = yball;
if(2 < direction && direction < 6) {
yball++;
} else if(direction != 6 && direction != 2) {
yball--;
}
if(0 < direction && direction < 4) {
xball++;
} else if(direction != 0 && direction != 4) {
xball--;
}
xball = max(0, min(7, xball));
yball = max(0, min(6, yball));
debug("AFTER MOVE");
}

void gameOver() {
setSprite(sad);
delay(1500);
lc.clearDisplay(0);
}

void drawGame() {
if(yball_prev != yball){
lc.setRow(0, yball_prev, 0);
}
lc.setRow(0, yball, byte(1 << (xball)));
byte padmap = byte(0xFF >> (8 - PADSIZE) << xpad) ;
#ifdef DEBUG
//Serial.println(padmap, BIN);
#endif
lc.setRow(0, 7, padmap);
}

void setup() {
// The MAX72XX is in power-saving mode on startup,
// we have to do a wakeup call
pinMode(POTPIN, INPUT);

lc.shutdown(0,false);
// Set the brightness to a medium values
lc.setIntensity(0, 8);
// and clear the display
lc.clearDisplay(0);
randomSeed(analogRead(0));
#ifdef DEBUG
Serial.begin(9600);
Serial.println("Pong");
#endif
newGame();
ball_timer = timer.every(BALL_DELAY, moveBall);
}

void loop() {
timer.update();
// Move pad
setPad();
#ifdef DEBUG
Serial.println(xpad);
#endif
// Update screen
drawGame();
if(checkLoose()) {
debug("LOOSE");
gameOver();
newGame();
}
delay(GAME_DELAY);
}

/////////////////////// * kết thúc chương trình *////////////////////////////
![Hướng dẫn Kết nối Cảm Biến Gy-271 [HMC5883l] với Arduino Uno](https://dammedientu.vn/wp-content/uploads/2018/02/4_gf.jpg)